

Well, I was figuring out how you will thread your sewing machine. Get out your sewing machine and start sewing again for a wonderful New Year’s resolution. Yes, it appears to be a good concept, but when was the last time you did some machine sewing or sat down and learned how to thread a sewing machine?
The most fundamental beginning step is appropriately threading your sewing machine. So dust off your machine, pull yourself up and get ready to sew all over again. Add some helpful hints to make the process go more smoothly, and your relationship with your sewing machine might improve dramatically.
Threading the machine can be intimidating for beginner sewing machine users, and it may even put you off sewing entirely. However, once you’ve learned how to thread your machine, it will become a habit and will become easier with each subsequent attempt.
Importance of Proper Threading
Threading your sewing machine correctly is essential for achieving stable and appealing stitches. Although sewing machines vary in size and brand, the process for creating a stitch on a home sewing machine is the same—it creates stitches by joining the needle thread with a second thread from the bobbin.
Also, you can get knowledge from sewing machine reviewers about which company offers the easiest to use models. Threading a sewing machine is a quick and simple operation that takes less than five minutes.
Before you Start
- To begin, consult your sewing instructions if you have one. It should provide diagrammatic instructions for threading your machine. If you’ve misplaced your handbook, check this page for links to online sewing machine manuals.
- Always use high-quality threads like Rasant, Gutterman, or Coates. Your thread should be appropriate for your cloth selections.
- Fill the bobbin with the color thread you intend to use.
Threading a Sewing Machine in 10 Simple Steps
Now before we show you the close-up of each step of how to thread a sewing machine, we have made this diagram so you can visualize the overall path the thread will take.
Step 1: Top Spool
Place your cotton on the spool at the sewing machine’s top. Depending on your machine, this might be an upright or a laying down a peg. Your machine may come with a plastic disc to place on top of the spool to keep it in the right place as well as prevent it from flying off the top once you begin stitching.
Step 2: Thread Guide
Thread the thread through the top thread guide. The handbook for this Brother machine is rather large. The guide is frequently a tiny button-like knob.
Step 3: All the way around the Tension Knob
Pull the thread down towards you and wrap it around the tension discs beneath.
Step 4: Second Thread Guide
Then, draw the thread up into the second thread guide once more. This will have a lever with an eyelet, which is commonly referred to as the take-up lever. The thread forms a U shape as a result of this.
Step 5: Above Needle Hook
To hold the thread, bring it down to the needle and follow any hooks.
You Have Completed Your Half thread
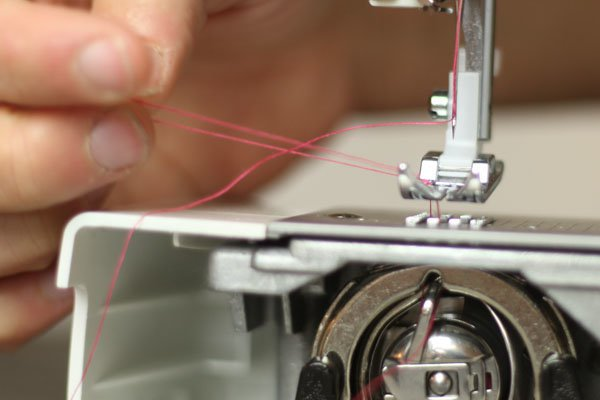
Step 6: Thread the Needle
Then, from front to back, thread the needle. If you’re having problems threading the needle, have a look at the advice lower down this page.
Step 7: Insert Bobbin
Load your wound bobbin in accordance with the bobbin type and handbook instructions. The bobbin in your machine may be inserted from the top or from the front.
Some machines feature a detachable casing into which the bobbin is inserted, while others drop straight down into a fixed position. Such features you’ll find convenient if you have a sewing machine such as the Janome Derby Sewing machine. Read Janome Derby Sewing Machine Review to know about some other magical features.
Turn the flywheel (the large wheel on the right side of the machine) towards you so that the needle connects the top and bottom threads.
Bring the thread from the bobbin all the way to the top of the machine plate, where the needle goes in and out.
Step 8: Connect the Bobbin and the Top Thread
Find the bobbin thread loop that has been entangled and draw it to the top. To grasp it, you may require tweezers or a pin.
Step 9: Pull the threads to the rear of the garment.
Pull both threads gently to the rear. They should be able to run freely while you pull them.
Step 10: Test on a Scrap
Examine your stitches and tension on a scrap of cloth. Hold the threads carefully at the rear as you begin stitching to avoid tangles between the top and bottom threads. Remember to lower the foot to keep the fabric stable and to connect with the feeding mechanism.
Threading a Sewing Machine – Extra tips
Once you’ve mastered the fundamentals of threading, the only remaining obstacle may be needle threading. What could be simpler than threading a piece of cotton through the eye of a needle?
In general, it’s a simple activity, but the sewing machine needle cannot be held up to the light, closer to your point of view, or further if you’ve reached the reading glasses stage of life! Your little needle with an eye is attached to your machine and inserted into a socket. It is the final stage in the threading of a sewing machine.
Helpful hints for threading a machine needle:
- Trim the thread end with a pair of razor-sharp scissors.
- If you do require glasses, have an extra pair that are somewhat stronger just for threading the needle. It will aid in magnifying the needle’s eye.
- You may moisten the end of the thread with a subtle lick of your lips or a wet fingertip. Threading is easier when the thread is wet.
- There are also little gadgets available to assist in needle threading.
- Additional lighting on the topic is also an option. The gadget includes a light, but a study lamp might just provide a little additional illumination on the subject.
- Before using any machine, it should be fully cleaned and oiled.
- To avoid extra lint in the machine, use high-quality thread.
- To verify your machine’s threading, always begin stitching gently. To try a basic straight seam, practice with samples or scraps.
- If your stitching is uneven, the tension has to be adjusted.
- Begin with small tasks and concentrate on learning and mastering the speed and settings of your machine.
- Swap the needle of your sewing machine regularly.
Some sewing machines such as Singer 1234 can be so easy to thread. Why? As there’s a feature called automatic threading system, read Singer 1234 Review to know more. ‘Threading the needle’ is a word used to describe various actions in action sports. Is it possible to classify sewing as an action sport? Hopefully not too risky, just an opportunity to get you closer to the thrill of starting something new.