

Shifting the data from Windows to Mac can be easy to perform, but going to vice-versa is not an easy as it sounds. And, in the current days, we observe that a lot of Mac Outlook 2011 users want to shift their database into Outlook 2016 Windows email client. If you are the same, then don’t worry anymore just go with this blog post that will discuss the complete working guide to migrate Mac Outlook 2011 to Outlook 2016 Windows application so that you can follow it. So, go to follow this entire post for getting the best material.
How to Migrate Mac Outlook 2011 to Outlook 2016 Windows? – Safe Working Guide
In this solution, you can freely go through with the all conversion steps to import Mac Outlook 2011 to Outlook 2016 Windows application. So, follow the steps are mentioned below:
Extract OLM Files from Mac Outlook 2011:
- Download and launch Mac Outlook 2011 application
- Go to the File menu and select Export from the list of other options.
- Export wizard opens where you need to choose the Outlook for Mac Data File (.olm) option and also select the Items which you want to export from the given items i.e. emails, calendars, contacts, tasks, and notes.
- After selecting the items, go to click on the Next arrow to continue the process
- Choose the “No, do not delete items” option if you want to collect all original items after migration. Hit the Next button again.
- Enter the suitable name and select the desired destination to save the extracted OLM file into Windows Desktop, and then hit the Save button.
- The process starts for exporting the selected OLM mailbox items from Mac Outlook. When it finishes you can go to follow the further steps.
Migrate OLM File in PST File Format Supported by MS Outlook:
- Install and open CubexSoft OLM to PST Converter on your Windows PC
- Import the extracted OLM files into the software using Select File or Select Folder tabs
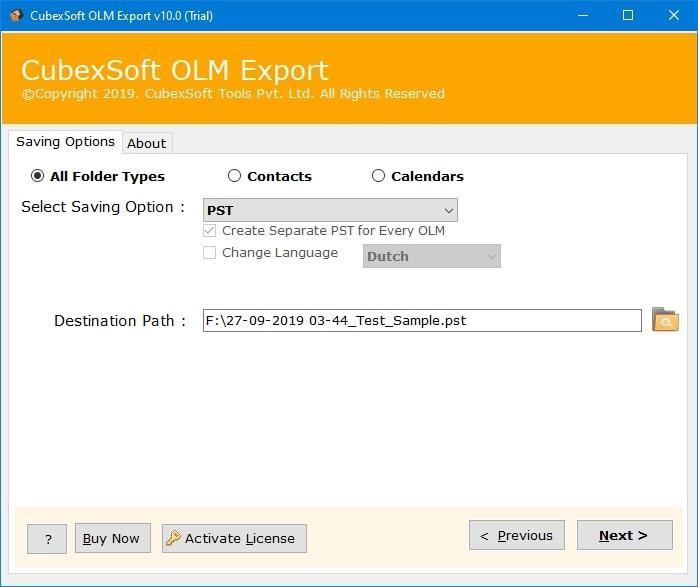
- Hit the Next button and choose the PST option from saving output formats.
- Avail advance option of PST format if you need i.e. create separate PST for each OLM.
- Select the location path where you want to save the PST files on your machine. Then, click on the Export button to starts the conversion process.
- Once the conversion process completes, it shows you a message i.e. Conversion is Done. Click Ok and go to check your PST files.
Import PST Files into Outlook 2016 Application:
- Open Microsoft Outlook 2016 email client, choose File option from the top menu
- Select the options: Open & Export >> Import/Export.
- From Import and Export Wizard, choose the option i.e. import from another program or file and then go to hit the Next button.
- Click to choose Outlook Data File (.pst) option from Import a File Window and hit next again.
- Now, Browse the location of your PST files where it is saved. Then, choose to Replace duplicates with Items imported option and press the Next button.
- From the Outlook import data file Window, choose the options as per the requirement and go with the Finish button.
Last Words
After performing the all above steps, you can successfully migrate Mac Outlook 2011 to Outlook 2016 Windows application without any problem. And, for converting OLM files to PST format you can download OLM Converter free demo edition that exports the first 25 items only. For the above 25 items, you can buy the license edition of the software.